
Integrations
Integrations
Integrations
Integrations
Configuring Zoom
Configuring Zoom
Configuring Zoom
Configuring Zoom
This article gives step-by-step instructions on how to configure a Zoom integration within Fabius.
This article gives step-by-step instructions on how to configure a Zoom integration within Fabius.
Introduction
The Fabius-Zoom integration allows you to seamlessly connect your Fabius account with Zoom, allowing us to pull in Cloud Recordings to transcribe and analyze. In this guide, we'll walk you through the steps to configure the Zoom integration.
Step-by-Step Guide: Configuring Zoom Integration with Fabius
Step 1: Configure your Zoom Account to Record and Transcribe By Default
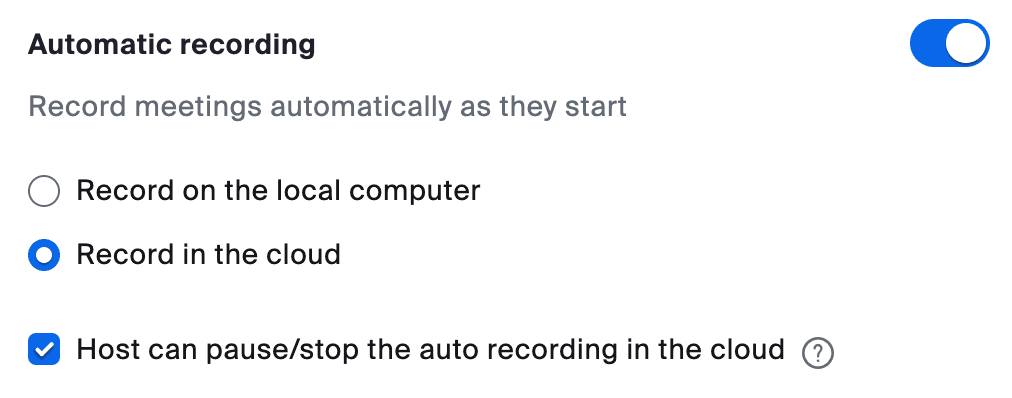
Change call recording settings to Automatically record all calls to the cloud by default.
This can be found under Account Settings > Recording > Automatic recording.
Follow the Zoom help center documentation here.
Update your call recording settings to Allow Call Recording Transcriptions.
This can be found under Account Settings > Recording > Cloud recording > Advanced cloud recording settings.
Follow the Zoom help center documentation here.

Step 2: Accessing Fabius Integration Settings
Log in to your Fabius account.
Navigate to the Settings menu by hovering over the gear icon on the left nav bar.
From the drop-down menu, select Integrations.
Step 3: Adding Zoom Integration
On the Integrations page, you'll see a list of available integrations. Locate and click on the Zoom integration option and click Configure.
Step 4: Initiating the OAuth Flow
By selecting the Zoom integration, you will be directed to the Zoom OAuth authorization page.
If you're not already logged in to your Zoom account, you will be prompted to do so.
After logging in, Zoom will request permission to grant Fabius access to specific data and functionalities. Review these permissions carefully.
Click the Authorize or Allow button to proceed.
Step 5: Returning to Fabius
After authorizing the integration, Zoom will redirect you back to your Fabius account.
At this point, your Zoom integration setup is complete. You will notice that the Zoom integration status in the Integrations section now reads as Connected.
Using the Zoom Integration in Fabius
With the Zoom integration successfully configured, Fabius will begin ingesting your meeting recordings for transcription and analysis.
Troubleshooting
If you encounter any issues during the integration process, consider the following steps:
Ensure you have an active Zoom account and the necessary permissions to authorize integrations (you must be an Administrator).
Double-check that you're using the correct login credentials for both Fabius and Zoom.
Clear your browser's cache and cookies, then attempt the integration again.
If problems persist, reach out to our support team via support@fabius.io for further assistance.
Introduction
The Fabius-Zoom integration allows you to seamlessly connect your Fabius account with Zoom, allowing us to pull in Cloud Recordings to transcribe and analyze. In this guide, we'll walk you through the steps to configure the Zoom integration.
Step-by-Step Guide: Configuring Zoom Integration with Fabius
Step 1: Configure your Zoom Account to Record and Transcribe By Default
Change call recording settings to Automatically record all calls to the cloud by default.
This can be found under Account Settings > Recording > Automatic recording.
Follow the Zoom help center documentation here.
Update your call recording settings to Allow Call Recording Transcriptions.
This can be found under Account Settings > Recording > Cloud recording > Advanced cloud recording settings.
Follow the Zoom help center documentation here.
Step 2: Accessing Fabius Integration Settings
Log in to your Fabius account.
Navigate to the Settings menu by hovering over the gear icon on the left nav bar.
From the drop-down menu, select Integrations.
Step 3: Adding Zoom Integration
On the Integrations page, you'll see a list of available integrations. Locate and click on the Zoom integration option and click Configure.
Step 4: Initiating the OAuth Flow
By selecting the Zoom integration, you will be directed to the Zoom OAuth authorization page.
If you're not already logged in to your Zoom account, you will be prompted to do so.
After logging in, Zoom will request permission to grant Fabius access to specific data and functionalities. Review these permissions carefully.
Click the Authorize or Allow button to proceed.
Step 5: Returning to Fabius
After authorizing the integration, Zoom will redirect you back to your Fabius account.
At this point, your Zoom integration setup is complete. You will notice that the Zoom integration status in the Integrations section now reads as Connected.
Using the Zoom Integration in Fabius
With the Zoom integration successfully configured, Fabius will begin ingesting your meeting recordings for transcription and analysis.
Troubleshooting
If you encounter any issues during the integration process, consider the following steps:
Ensure you have an active Zoom account and the necessary permissions to authorize integrations (you must be an Administrator).
Double-check that you're using the correct login credentials for both Fabius and Zoom.
Clear your browser's cache and cookies, then attempt the integration again.
If problems persist, reach out to our support team via support@fabius.io for further assistance.
See Fabius In Action
Curious how Fabius can move the needle on your unique sales KPIs? Let us create a custom demo, filled with insights from your team's actual calls and emails. No generic pitches - just a tailored analysis of how Fabius can become your reps' best sidekick.
See Fabius In Action
Curious how Fabius can move the needle on your unique sales KPIs? Let us create a custom demo, filled with insights from your team's actual calls and emails. No generic pitches - just a tailored analysis of how Fabius can become your reps' best sidekick.
See Fabius In Action
Curious how Fabius can move the needle on your unique sales KPIs? Let us create a custom demo, filled with insights from your team's actual calls and emails. No generic pitches - just a tailored analysis of how Fabius can become your reps' best sidekick.

Industries
Information
© 2024 Fabius Technologies. All Rights Reserved.
Industries
Information
© 2024 Fabius Technologies. All Rights Reserved.
Industries
Information
© 2024 Fabius Technologies. All Rights Reserved.